Project set up
Open your terminal, and enter the following commands to set up a new project.
mkdir mocha-hands-on
cd mocha-hands-on/
git init
echo "/node_modules" >> .gitignore
Now that we have set up our project folder, we can install Mocha, our test runner. We install it as a development dependency on this project:
npm i --save-dev mochaNext, let's make this project folder a NodeJs project, in order to manage it
using npm tools.
When you run npm init, you will be prompted to do enter various values to
initialise your package.json file with.
The text in parentheses indicates the default value that will be used.
For example: package name: (mocha-hands-on) means that the package name
will be set to mocha-hands-on if you just hit Enter without typing anything.
Here are the values that we have used:
$ npm init
package name: (mocha-hands-on)
version: (1.0.0) 0.0.0
description: Mocha Hands-on for DApps Dev Club
entry point: (index.js)
test command: (mocha) mocha './**/*.spec.js'
git repository: dapps-dev-club/mocha-hands-on
keywords: mocha, hands-on, dapps-dev-club
author: bguiz
license: (ISC) GPL-3.0
The most important thing is that the test command must be entered exactly
as mocha './**/*.spec.js'.
Version control with git
Now we have completed our set up, we strongly recommend that you do
a git commit at this point, before moving on to the next steps,
so that you can revert to this known point easily if need be.
git add package.json .gitignore
git commit -m "initialise project"
Optionally, you may wish to push your project to github:
Create a new repository on github. To do this, go to your profile (or organisation page, if you have one), and click on the New button.
Alternatively, you may click on the + icon in the top-right corner.
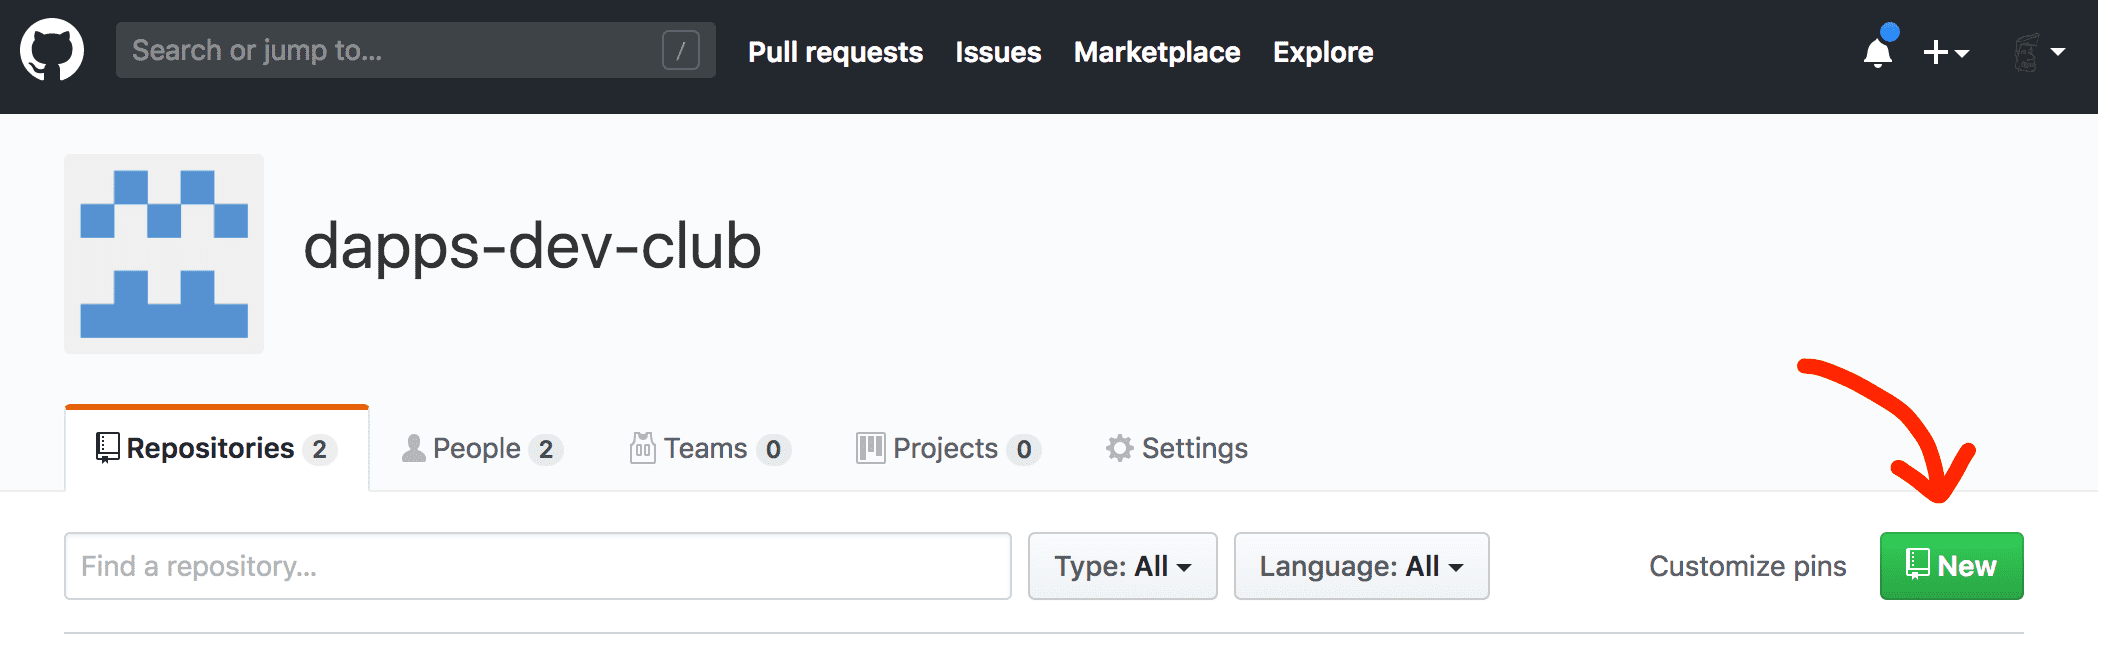
Next, enter some details about your repository.
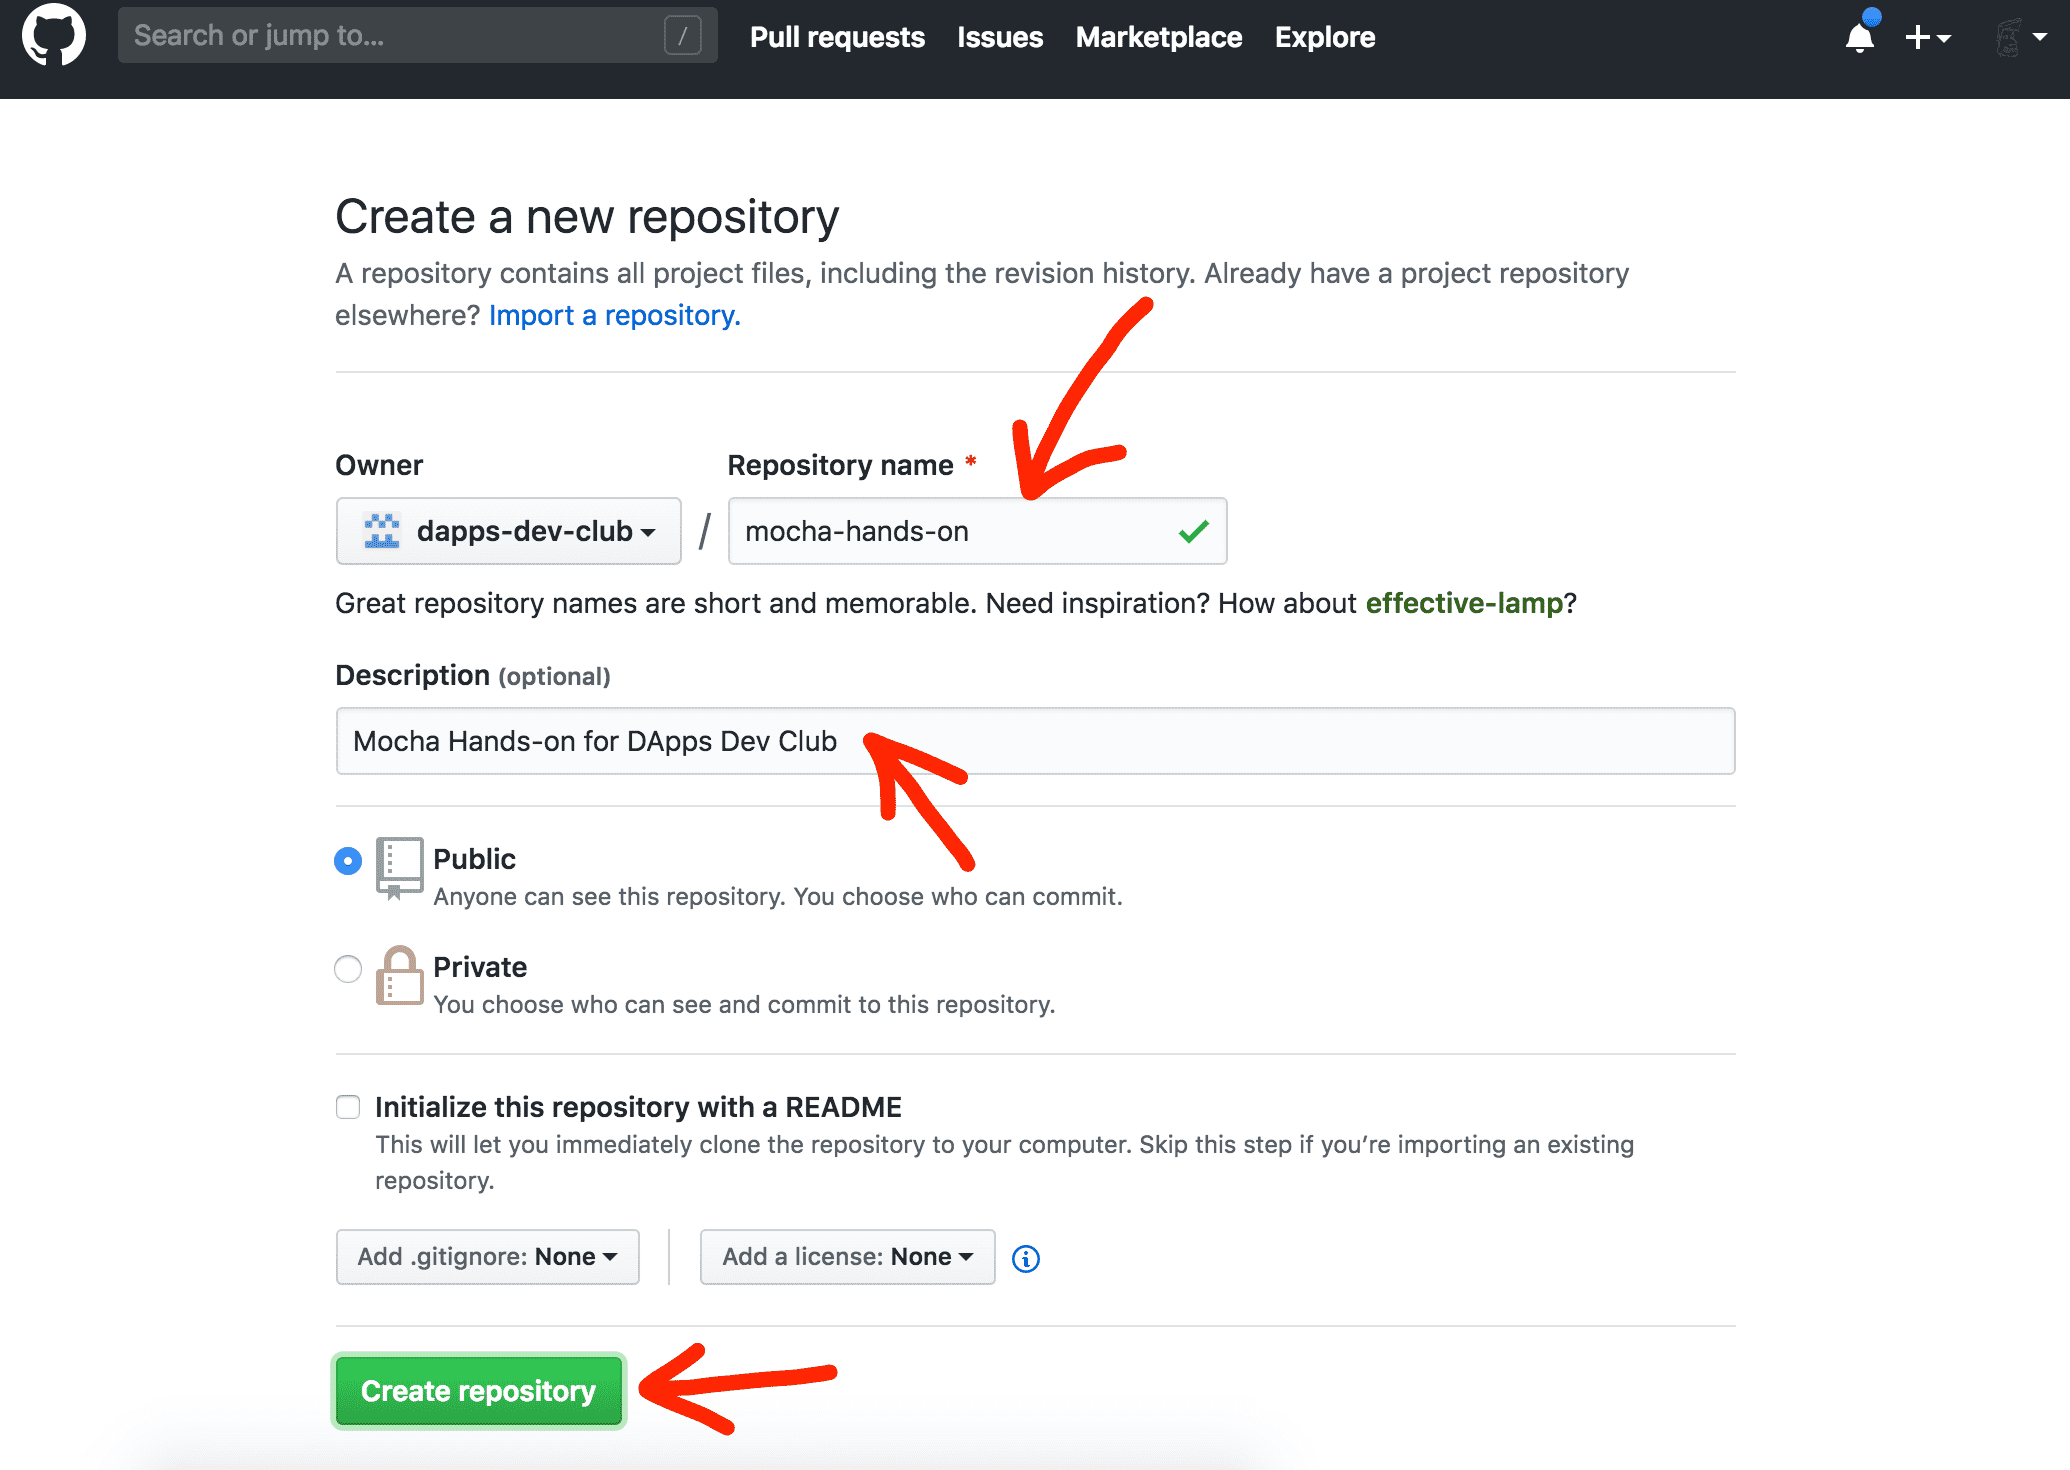
- Set the name to
mocha-hands-on. - Set the description to
Mocha Hands-on for DApps Dev Club. - Check that the visibility is Public (should be selected already as the default).
- Do not select any of the repository initialisation options, as we do not need any of them.
- Click on Create repository.
This should create the repository on Github, but it is empty.
What you are interested in is the git remote address.
Copy the command that starts with git remote add.
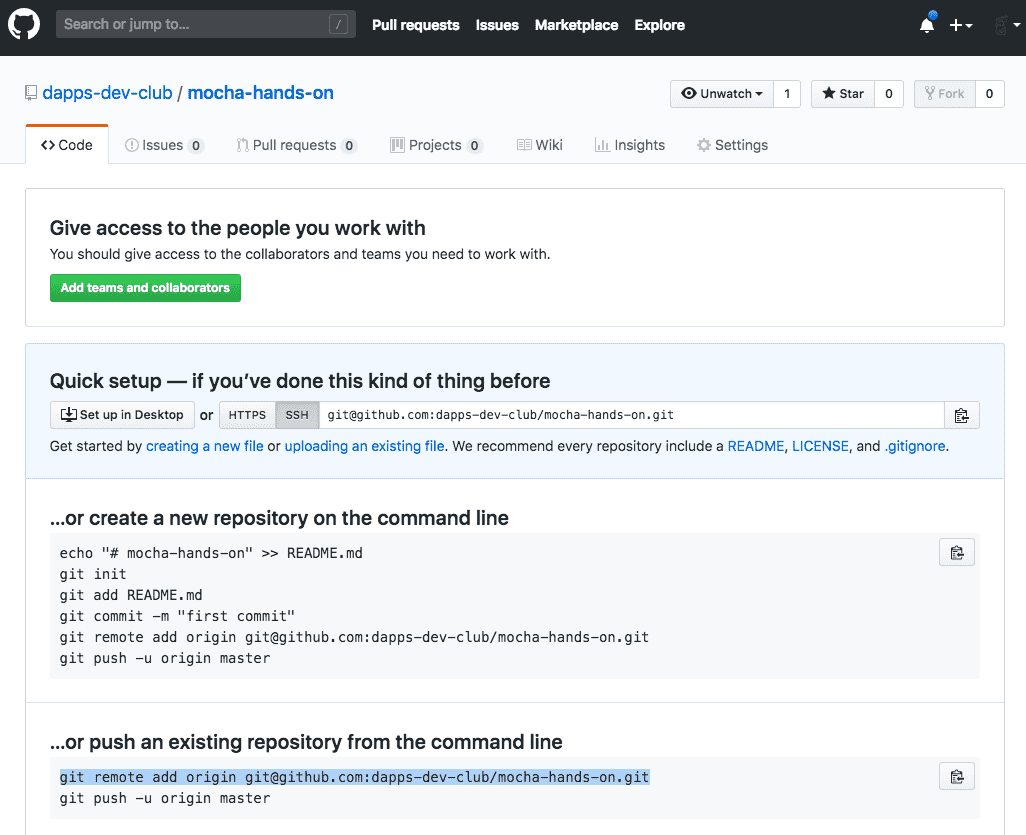
Paste that command into your terminal, then take a look that it has been added:
$ git remote add origin git@github.com:dapps-dev-club/mocha-hands-on.git
$ git remote -v
origin	git@github.com:dapps-dev-club/mocha-hands-on.git (fetch)
origin	git@github.com:dapps-dev-club/mocha-hands-on.git (push)
Now you can finally push your repository to the remote hosted on Github.
git push origin masterWrite some code
Next let's create an implementation file, and a corresponding specification file:
touch feature1.js # implementation
touch feature1.spec.js # specification
Open your code editor of choice, and edit these files.
Implementation
For the implementation, we're going to have a very simple addition function.
// system under test: feature1

function add(x, y) {
  return x + y;
}

module.exports = {
  add,
};
Specification
Next we write specifications that the test runner (mocha), will use to test our implementation.
First, let's set up some basic structure.
We will import assert from NodeJs core,
and import add which is the feature that we implemented earlier.
Then we create some describe blocks to group tests together.
// tests for: feature1

const assert = require('assert');

const { add } = require('./feature1.js');

describe('feature1', () => {

  describe('add', () => {

    // tests go here

  });

});
Next, let's add a test for specific known values - we all know what one plus two equals:
    it('works with specific values', () => {
      // specific known values
      const result = add(1, 2);
      assert.equal(result, 3);
    });
Put this test inside your inner describe block.
The hierarchy should look like describe -> describe -> it at the moment.
Running your tests
npm run testYou should see that the test passes.
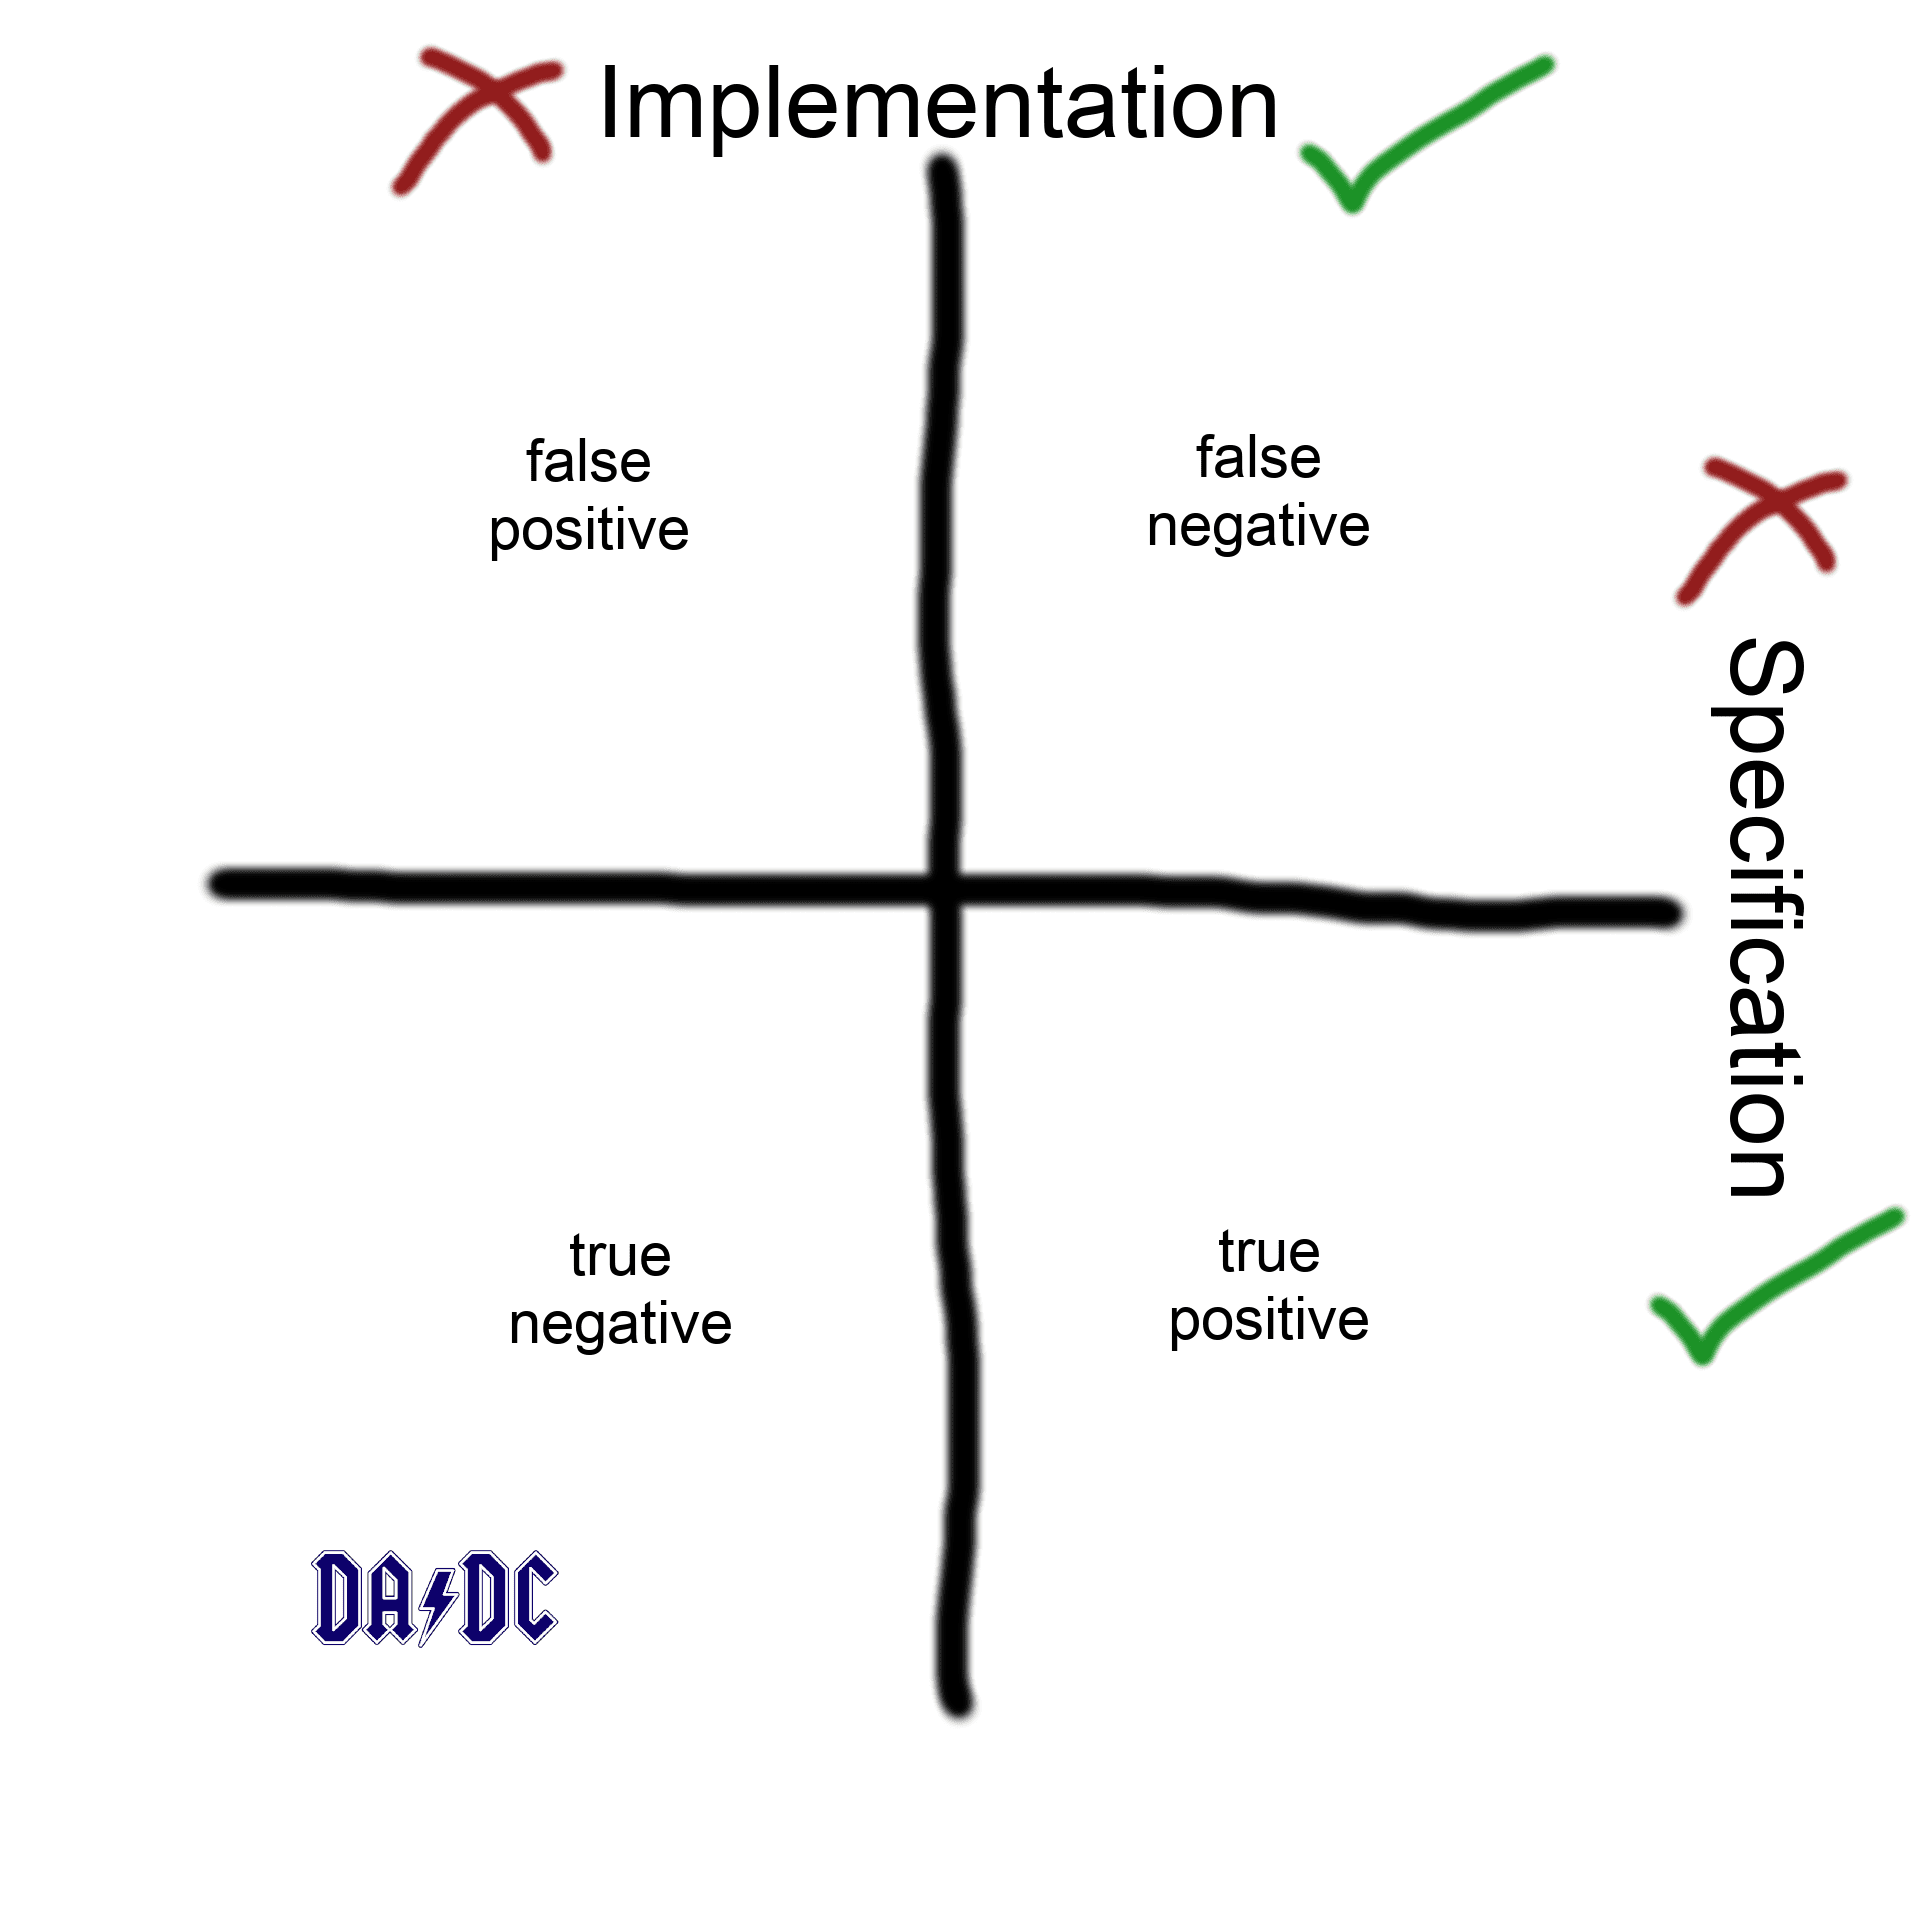
Now it's time to experiment:
-
Change the code in your implementation such that it returns the wrong result
- Run the tests again
- This is a bug in the implementation
-
Now revert to the original implementation, and change the code in your test, such that it has a wrong assertion
- Run the tests again
- This is bug in the specification
-
Now, without reverting to the original specification, change the code in your implementation such that it returns a wrong result as well.
- Run the tests again
- This is a false positive and indicative of bugs - or omissions - in both the implementation and and the specification
-
Now revert the implementation and the specification to their original code
- Run the tests again
- 😅 back to passing tests
- This is what you should ideally have
Write more tests
Next, let's test that our add function conforms to some mathematical laws:
A test for commutativity:
    it('is commutative', () => {
      // a + b = b + a
      const leftHandSide = add(15, 99);
      const rightHandSide = add(99, 15);
      assert.equal(leftHandSide, rightHandSide);
    });
A test for associativity:
    it('is associative', () => {
      // (a + b) + c = a + (b + c)
      const leftHandSide = add(add(15, 99), 890);
      const rightHandSide = add(15, add(99, 890));
      assert.equal(leftHandSide, rightHandSide);
    });
Help, I'm stuck!
For those of you who have gotten stuck at some point, here's a reference copy of the repository for you to clone:
github.com/dapps-dev-club/mocha-hands-on
To optimise for learning, do not delete the current copy of your attempt - instead keep that as it is, and clone this reference copy to another folder. Then compare them side-by-side, and work out what the differences are.
Next go to our chat and ping us with what you've found out, as it might help others who have done something similar in their own attempts.
Property based testing
This is a stretch goal that is not required for this session, catered to those of you who have already worked with Mocha before, and are already twiddling your thumbs!
Reading material
About using property based testing (sometimes AKA generative testing)
- https://en.wikipedia.org/wiki/QuickCheck
- http://hypothesis.works/articles/what-is-property-based-testing/
- http://www.lihaoyi.com/post/PrinciplesofAutomatedTesting.html
- https://github.com/leebyron/testcheck-js/tree/master/integrations/mocha-testcheck
- https://github.com/bguiz/jest-property-testing-demo
Tasks
- Use
mocha-testcheckto write property based tests runnable by mocha - Write these tests in a new file named
feature1.gen.spec.js - Copy existing tests, and convert them to be property based
- Run the tests
npm install --save-dev mocha-testcheck
touch feature1.gen.spec.js
npm run test
Hints:
- Use
gen.intat first, then switch togen.number - What happens when you run the tests now?
- Where does this indicate on the implementation and specification correctness quadrants?